Facebook Chatbot in ASP.NET
In this blog post, I would like to show you how to implement a simple prototype of Facebook chat bot.
Chat bots are new and trending marketing tool to communicate ideas or products values to consumers. I don’t want to explain the main advantages and bots purposes. If you interested to learn more, please see this blog.
Facebook doesn’t want to stay behind and also this year introduces their Messenger platform. On this platform, you can build your bot to communicate through facebook messenger.
As Facebook said:
Bots for Messenger are for anyone who’s trying to reach people on mobile — no matter how big or small your company or the idea is, or what problem you’re trying to solve. Whether you’re building apps or experiences to share weather updates, confirm reservations at a hotel, or send receipts from a recent purchase, bots make it possible for you to be more personal, more proactive, and more streamlined in the way that you interact with people.
On this link, there is a brief summary what the Messenger platform is. So if you are an absolute beginner in these ares, please read this blog post before continue.
On the Internet, there are some examples how to implement facebook chat bot in Javascript, PHP, and other languages. So there are my 2 cents: Chatbot in ASP.NET.
We will create a simple chatbot that does only one thing. It echoes back your message.
For this bot, I will use standard ASP.NET MVC project template. But first, we need to make some settings on the Facebook.
Setting the Facebook
First we need Facebook developer account.
Go to the: https://developers.facebook.com
Register or login if you have a account. After you are logged, you can create a new app.
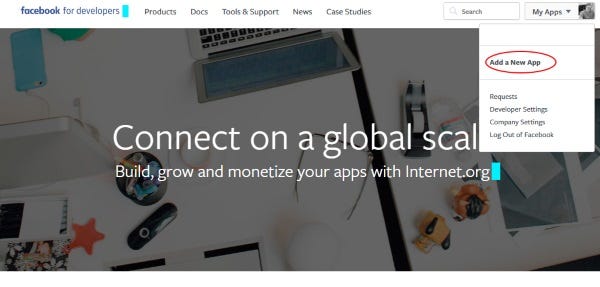
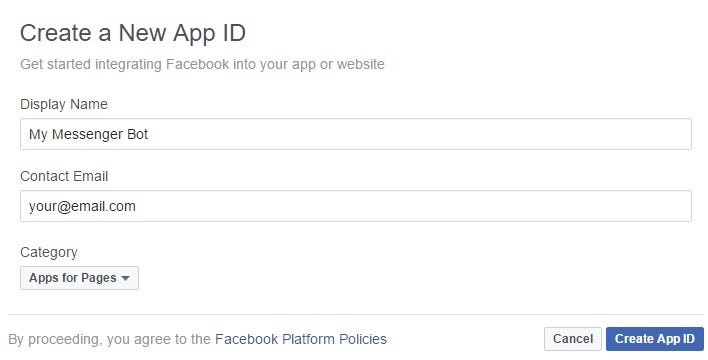
Modal dialog for creating a new app is simple. Just fill name of your application, contact email, and category.
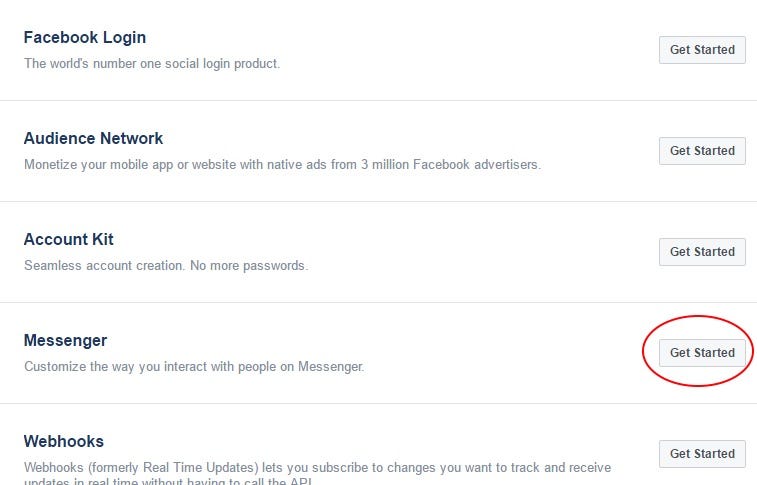
After your new application is created, you can add a new “product.” Your Facebook application can contain products like Facebook login, Audience network and s.o. For our bot we need Messenger. So click on the button GetStarted in section Messenger.
In opened page, you need select page where the Messenger will be “hosted” and then click “Setup Webhooks.”
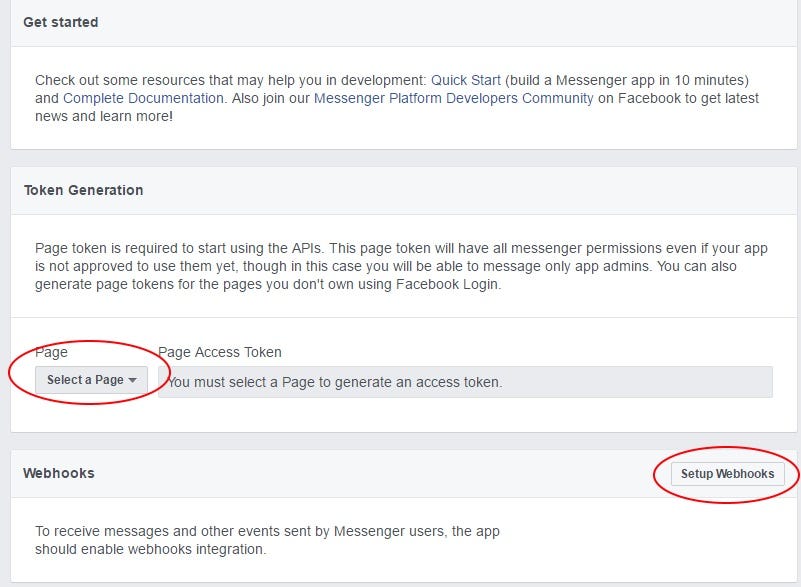
Webhooks is a great tool that you can use when you need to be informed in real time when something has happened in Facebook. In our example, we will need information when our user has sent us a new message via messenger.
You can learn more about webhooks in this post (https://developers.facebook.com/docs/graph-api/webhooks)
In webhooks dialog, please fill a “Callback URL”. It is URL of your application, path to controller and name of the method.
Verify token — you can choose your own. But on your server and in this input must be the same(where you have to check verify token you will see later in this post)
From Subscription Fields, please choose “message_deliveries”, “messages”, “messaging_optins”, and “messaging_postbacks”, as you see in the picture.
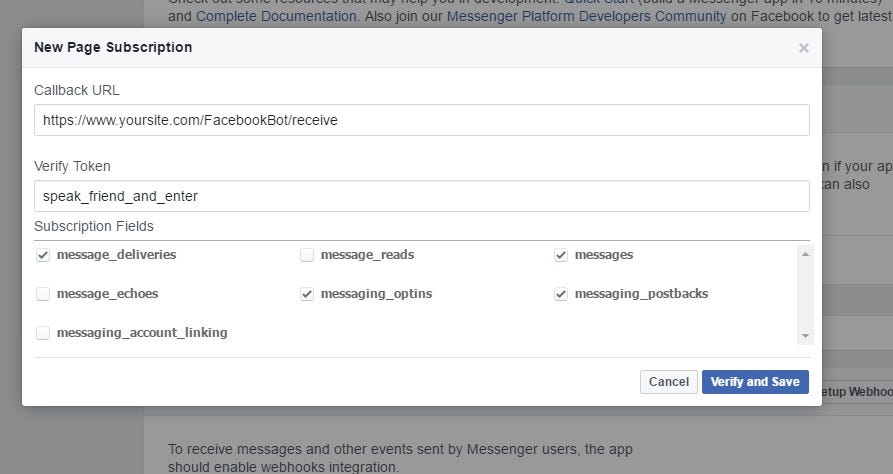
Now you have everything ready to test your chat bot. Let’s do some coding.
ASP.NET MVC Solution
We will start with creating a simple ASP.NET MVC application. If you don’t know how to start or how to create ASP.NET MVC application please read this ASP.NET official tutorial.
So I assume that you have an MVC solution. Let’s make our bot alive.
First, we need to create a new class FacebookBotController inherited from class Controller
To this created class paste this code:
So now the FacebookBotController contains three methods. I will explain them individually.
Receive
This method is used to handle first validation request from the Facebook. Validation request is sent as an HTTP request(verb get). You have to check verify token and answer by value in the received challenge(this is another parameter facebook send to page).
If something goes wrong, you need return HTTP response with status code 404.
PostRaw.
This is only a helper method. It shows one of the ways how to send post request from C#. It is bit a low level but in this situations it works fine.
ReceivePost
ReceivePost is our primary method. Here you receive every call from the Facebook. I’ll describe it more thoroughly. Let’s start with attributes.
[ActionName(“Receive”)]
[AcceptVerbs(HttpVerbs.Post)]
These two attributes serves for routing. Put it simple this method is called when on our asp.net page is received a HTTP request by method POST and action name is Receive.
Please note that the type of input parameter is BotRequest. BotRequest is my class which represents a webhook request from the Facebook. There is documentation of the webhooks request structure.
The Facebook request can’t be represented only by one class. It needs to create the whole large hierarchy of classes. However there are good news. You don’t have to write these classes by yourselves because I wrote it yet. See this hierarchy on my GitHub Gist.
I would like to emphasize that I use a utility class Task.Factory to fire a message to Facebook. As you see I am returning response code 200(last line “HttpStatusCodeResult(HttpStatusCode.OK)” ) and asynchronously sending the message.
You can of course write synchronous version(remove Task wrapper) but Facebook has this policy:
It is extremely important to return a 200 OK HTTP as fast as possible. Facebook will wait for a 200 before sending you the next message. In high volume bots, a delay in returning a 200 can cause significant delays in Facebook delivering messages to your webhook.
So your response need to be fast!
I believe that rest of the code is easy to understand. As I wrote, I just echo the received message. This is archieved by call the method PostRaw.
Maybe your last question: why there are two loops?
The answer is simple. The requests from the Facebook can be sent to you by batch. This means that you can receive more messages, so you need to loop them and process them one by one. For more information, please see webhooks documentation that I mentioned above.
So that’s all. Now you have the first dummy Facebook bot. You can add some logic to modify how bot should response to various messages and show this bot to your friends. Happy chatting:)

